
Installation Guide for Self-Adhesive Tactile Strips and Studs
- eliteinformationte
- Apr 1
- 4 min read
Providing safe and convenient walkways is not only a matter of compliance. It is concerned with assisting people to move confidently. A simple but effective solution to guiding the visually impaired people in public and personal areas is to use self-adhesive tactile strips and studs. This installation guide will guide you to install tactile indicators in the appropriate manner and in the quickest way possible, in case you are planning on installing these in a commercial building, railway station, mall, hospital, or office complex.
MetalX Engineering Inc produces high-quality products that are durable, adhesive, and long-lasting. Nevertheless, proper installation is equally important in ensuring their performance as expected.
What is the rationale behind self-adhesive tactile strips and studs?
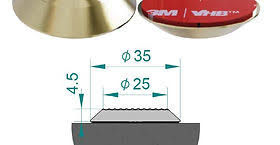
Tactile indicators that are self-adhesive are the most commonly used since they are simple to install and affordable. Adhesive-backed strips and studs can be glued to the existing flooring, unlike conventional systems that require drilling or extensive surface work.
Key Benefits
● No heavy machinery required
● Minimal disruption to daily operations
● Suitable for retrofit projects
● Strong bonding on smooth surfaces
● Time-saving installation process
These products are commonly installed on tiles, marble, granite, concrete, and other firm flooring surfaces. This type of product is usually applied to tiles, marble, granite, concrete, and other hard floors.
Supplies and Equipment Needed
The following will be required before installation begins:
● Measuring tape
● Chalk or marking pencil
● Spirit level
● Cleaning cloth
● Surface cleaner or alcohol solution
● Rubber mallet or hand roller
Having everything ready prevents delays and ensures accurate placement. Avoid delays, decide that all is ready, and be in the right places.
Installation Instructions/Tutorial
1. Surface Preparation
● Wipe the floor clean to eliminate dust, oil, grease, and moisture.
● Check if the surface is clean and smooth.
● Avoid installing on uneven or cracked flooring
Cleaning provides a good adhesive bond and lasting durability.
2. Mark the Layout
● Determine the required distance between stairs, ramps, or platform edges.
● Draw lines using chalk.
● Use a spirit level
The tactile walks must guide pedestrians and warn them to put studs where they might fall, like on staircases or platform edges.
3. Peel and Position
Once the layout is marked:
● Removal of the protective cover of the adhesive.
● Place the strip or stud along the line that has been marked.
● After being placed, do not reposition because the adhesion may be lost.
Move gradually and place a firm hand along the strip.
4. Apply Firm Pressure
After positioning:
● Take a hand roller or rubber mallet.
● Apply equal and uniform pressure across the surface.
● Be equally concerned with edges and corners.
The adhesive is activated by proper pressure and enhanced bonding power.
5. Allow Adhesive to Set
Even though self-adhesive tactile strips stick together fast, it is advisable that
● Prevent heavy foot activities for at least 24 hrs.
● Dry the area during the curing process.
This guarantees high stickiness and high performance.
To achieve better results, the following are some tips to be followed during installation:
Even high-quality tactile indicators may not work when they are installed in a wrong way. The following are some of the professional tips:
● Place them at moderately high temperatures to get maximum adhesive results.
● Use a dry or dry-humid atmosphere for the installation process.
● Before marking the layout, check with local accessibility rules.
● Always test a small area in case you are dealing with a new surface material.
MetalX Engineering INC products are designed to be strong and corrosion-resistant and are therefore applicable in both indoor and outdoor environments. When properly installed, they offer a durable tactile response and visibility.
Critical Installation Errors to Prevent
● Installing on wet or dirty surfaces
● Incorrect spacing between studs
● Misalignment of directional strips
● Allowing immediate heavy traffic after installation
The Importance of Proper Installation
Not only do tactile strips and studs serve as decorative elements, but they also significantly contribute to safety. An effective installation guarantees adherence to the accessibility standard and provides a safe environment for visually impaired people.
Regardless of whether you are renovating an old building or you are working on a new development, the choice of products of MetalX Engineering Inc., which are long-term, and the proper installation procedure can contribute greatly to the future performance.
Conclusion
Self-adhesive tactile strips and studs are easy to install, though it depends on the detail. From surfacing to end-pressure application, each of the mentioned steps leads to durability and safety.
Select dependable products and pay close attention to this installation guide if you're planning an accessibility upgrade. Join hands with MetalX Engineering Inc to get high-quality, durable tactile products customized as per your needs.
In case you are planning to upgrade to accessibility, then select trustworthy products and adhere to this installation guide. To have good and durable tactile solutions made to suit your specific project requirements, contact MetalX Engineering Inc. and make your space more secure and approachable.
Frequently Asked Questions
1. Is it possible to put on self-adhesive tactile strips on the exterior?
Yes, they can be placed outside on a smooth, clean surface, but one must ensure that the place is dry at the time of installation.
2. What is the time for the adhesive to cure?
The first bonding is rapid, although it is advisable to stay off the heavy traffic for at least 24 hours.
3. Will professional tools be required to be installed?
There are no specific tools needed. The most basic measuring and cleaning supplies are needed.
4. Is it possible to remove tactile studs after placement?
It is possible to remove them, although it can spoil the adhesive and the underlying surface.


Comments